Is your software obsolete? Find out how to upgrade...

Bee BuzzTools.com

BuzzEdit 4 Toolkit Tutorial

How to Bury Jump Stitches Underneath Filled Regions

Introduction

Design with Visible Jump Stitches

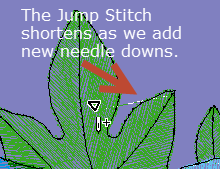
One of the most powerful features of BuzzEdit is its ability to help you "fix" designs that have jump stitches or other un-desirable features. With BuzzEdit you can ZOOM WAY IN and fix one stitch at a time when needed. This is especially useful when you want to bury long jump stitches by breaking the jump stitch into smaller stitches that are sewn underneath other areas. Not only can this make sew out faster but it also eliminates having to trim the jump stitches from your finished embroidery.

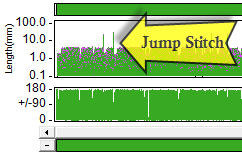
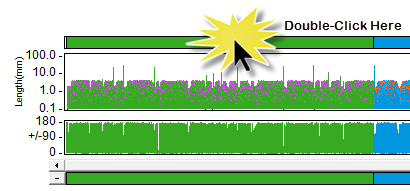
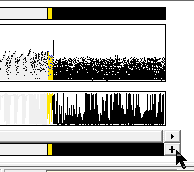
When looking at the BuzzEdit Stitches-in-Time Angle Graph, the tall stitches/spikes within a color are jumps stitches. If there's different colors on each side, it's just a normal color change. Not all jump stitches can be eliminated after all the machine has to get from one sewing area to another and if both areas are the same color you get a thread across the stitching that later needs to be trimmed. This can cause a lot of extra work unless you have an embroidery machine that cuts off jump stitches automatically.

Jump Stitch on Stitches-in-Time Length Graph

This YouTube tutorial was recorded using BuzzEdit v3 but the techniques are the same for BuzzEdit 4.

This tutorial teaches you how to bury jump stitches by adding traveling stitches underneath other areas of the design thereby eliminating the need to trim them. This also creates a cleaner looking design should you decide to sell your embroidery design originals. This is the easiest way to eliminate jump stitches but for obvious reasons can't be used in all cases. Once you are comfortable with this process you can try hiding jump stitches under zig-zag outlines or even under running stitch outlines.

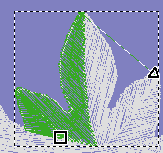
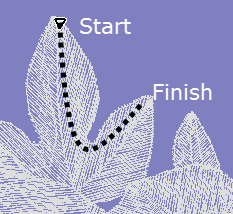
Look at all those green jump stitches in the design at the top of the page. Because the green leaves are in the first color sewn, it's pretty easy to bury them under portions of the design that will stitch later. To do this we will be using the powerful stitch editing capabilities found in BuzzEdit.

Step by Step Instructions

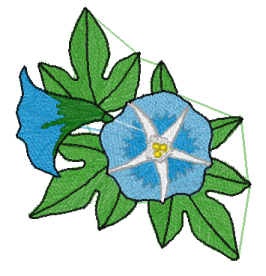
To follow along with this tutorial, download the MorningGlory.buz design.

  1. Open the sample design MorningGlory.buz in BuzzEdit. Immediately go to File > Save As and save your design as MorningGlory-BE using your favorite file type. I'm using a PES file so my new file is MorningGlory-BE.PES. This saves the original design should you need to start over.
  1. Select the first color - We're going to work on cleaning up the jump stitches in the first green color break so go to the top color bar in the Stitches-in-Time graph and double click on it to select all of these green stitches.
Zoom Stitches-in-Time
  1. Zoom the Stitches-in-Time Graphs - Now click on the + sign in the lower right corner of the Stitches in Time graphs (on the Stitches in Time Reference Bar) to zoom in on these stitches in Time.This lets you see those stitches more clearly in the Stitches-in-Time graphs.
Zoom Stitches-in-Time
Selection between two jumps
  1. Analyze the design - Before we get started, let's see how this design sews to get an idea how we need to proceed. For this you can run the sew simulator but here is another way to see how your design sews while having a little more control.

    Click HOME to make sure your stitch cursor is at the beginning of the design. Then hold down the SHIFT key and also hold down the RIGHT ARROW key. As long as you hold down the right arrow key, your selection will increase one stitch at a time and as your selection increases you can see how the design will sew from the first stitch on. At any point you can release the keys to stop adding to the selection. If you went too far forward, hold the SHIFT key and use the LEFT ARROW to remove stitches from the end of the selection. If you keep an eye on the Stitch length graph, you'll see when you are close to one of those jump stitches as shown in the image to the left.

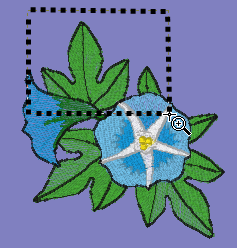
HINT: Since we are burying the jump stitches in an area of leaves that have many sections it's important to know where we can place the stitches so that they are covered by areas that stitch later in time. If we don't pay attention to this stitch order as we clean up the design we could end up accidentally placing our stitches over an area that has already been sewn which would not be attractive. Be sure to do a stitch out your changed design on a test piece of fabric before placing on a project.

  1. Position the Stitch Cursor Right Before the Jump Stitch - Now that we've taken a closer look at the design, we're ready to get started. Click on the Stitch Length Graph in front of the first jump stitch but above the other stitches. The stitch cursor will jump to right before the jump stitch. Use the RIGHT and LEFT arrow keys to jump back and forth across the jump to see where we will need to end up. If you didn't get your cursor in the right place, press Escape on your keyboard and try again.
Zoom the Work Area
  1. Zoom in on your Work Area - In the Space Reference Window, draw a rectangle that includes the entire jump stitch and the neighboring areas so that we can plan where to hide it. This will zoom the work window in on this area to give us a closer look at the area we are working on.
Zoom the Work Area
Planned Path
  1. Plan Where the New Stitches will Go - Looking at this jump I can see that we need to go down through the leaf and back up the other side making traveling stitches to the top of the right leaf section. A close up of this jump was shown in step 4. Since we watched how this section sews, we know that the fill stitches will cover over all of our traveling stitches. In this example we are not hiding our traveling stitches along an outline so the exact location of our needle downs isn't very important as long as we keep within the area that will cover it later.

    If you're hiding traveling stitches in an running stitch outine you would want to put your needle downs in the same place as the needle downs of the outline. Needle downs are shown as black squares in your design work window and you can always zoom in more if you need to see them more closely.

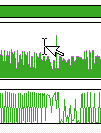
HINT: If you're not able to see your thread colors or the ghost color clearly in your workspace, use the View > Preferences command to change your background color to something else. Ghost color is a light gray and often a slightly darker background will allow you to see it more clearly.

  1. Insert the Traveling Stitches - Your cursor is the small triangle at the top of the leaf. Select the Insert Stitch tool. Position your mouse cursor so that the tip of the needle is in the spot you want to add a needle down. Each time you click you add a stitch so click only ONE time. Move to where you want the next stitch to go and click ONE time. Continue moving your cursor and inserting stitches along your planned path until you get to the top of the right leaf section. You should end up with around 10 or so inserted stitches. Notice that the jump stitch sortens as we add new needle downs.
Adding new needle-downs
  1. Final Thoughts - That jump stitch is now gone and you can work on the next one yourself. Remember to save your work often. If you really are nervous save lots of copies - one after each jump stitch is buried. Lots of saved copies could prevent you from having to start over from the beginning should you need to go back to an earlier version. When you are finished be sure to watch it sew using the sew simulator to ensure you didn't accidentally add stitching over your fill areas. A test sew out on a scrap piece of fabric is always recommended!

Think about it

QUESTION: What would have happened if we hadn't analyzed the design before we started?
ANSWER: We might have added our traveling stitches over the top of other stitching and not buried it at all.