
A simple creative design can be made from any three initials. For this example, I used the word MOM because I am using the design to decorate a grocery bag for a Mother's Day present. However, any two or three letters can be used to create the Kaleidoscope design.
First, you need to create the lettering. For best results, your lettering should be about 30% of your hoop since the corners of the initials will overlap. Therefore, if your embroidery hoop is 100mm square, your lettering should be no larger than about 33mm in either direction. Also, because the design will overlap itself, thinner lettering works best. You don't want to have thread nests at your embroidery machine!
I created my lettering using BuzzWord (which is accessible directly from BuzzEdit). If you don't have BuzzWord, you can create lettering in another program and open the lettering design into BuzzEdit.
The first time I tested with this design, I wasn't happy with the squareness of the lettering, so I went back and tweaked the position of each of the M's by selecting them each in turn and rotating them away from the center O. It is easy to select each letter by dragging along the stitch length graph between long stitches or by using the lasso in the Stitches-in-Space window. To rotate your selection, just click on the rotate toolbar button and drag the circular boundary.

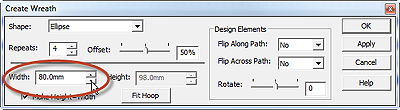
Now that the individual letters are in the desired positions, the kaleidoscope is created using the command BuzzTools > Create Wreath. You want the edges of the lettering to overlap so use the Width adjustment to pull the Kaleidoscope in toward the center of the hoop.