Is your software obsolete? Find out how to upgrade...

Bee BuzzTools.com

BuzzEdit 4 Tutorial

Splitting Over Sized Designs Using the Multi-Hoop Tool
by Lisa Laufer

Multi-Hooping

Our tech support team recently received an email from a customer who was confused about how to split an over sized design for manual hooping. Although we have information in our manual and video tutorials that cover this topic, what Marsha really wanted was a step-by-step guide for this process. We thought this was a great idea, so here you go Marsha!

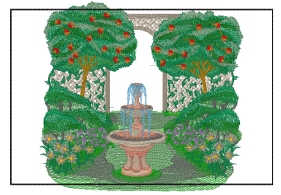
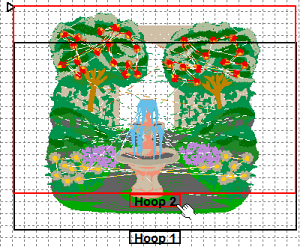
In this example, we are going to be using the Garden Fountain design available from Embroidery Library. Unlike a simple, sparsely filled design, this design poses more challenges. The nearly 12,000 stitches cover most of the design area making it a great design to use in this demonstration.

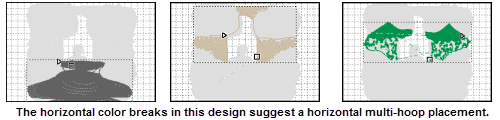
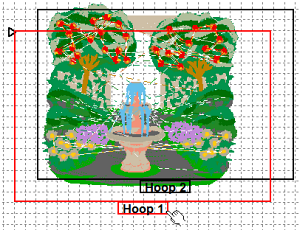
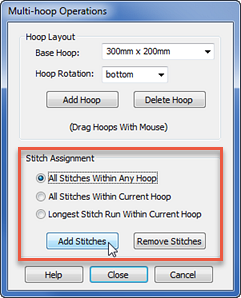
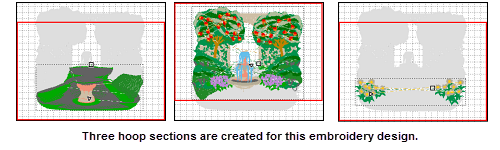
The design is just a little too big for Marsha's largest embroidery hoop so that means we need to set up a custom multi-hoop layout and split the design into sections. Since this is a "one time use" hoop layout, we're using the free form multi-hoop tool.

Free Form multi-Hooping

  1. Find the desired design and open it into BuzzEdit.
  2. Analyze the Design. You will save yourself a lot of grief if you take the time to analyze the design before you start. You are looking for stitching patterns and the location of large design elements that should be kept together in one hoop. Although you can run the sew simulator during this step, I prefer to step through the design, one color break at a time. Since you just opened the design, the stitch cursor is at the home position. Press the TAB key to select each color break in sequence.
                        Horizontal Hoop Placement

    In looking at the example design, it's clear that most of the color blocks run horizontally across the design. Therefore, when we set up our multi-hoop, we're going to set it up with horizontal hoop placement so that these horizontal color breaks won't have to be split (which would result in a lot of hoopings). Your design might require a different layout and might even require some hoop sections to be horizongal and others to be vertical. Don't worry if you have it all figured out. Your just trying to get a good idea about where to start.

  1. Turn the design into a multi-hoop design by clicking on the Multi-Hoop Operations tool (on left toolbar).

    WARNING: All of the following steps are performed with the Multi-hoop Operations dialog open so don't close it until you are told to do so!

Multi-Hoop
  1. Choose the Base Hoop - All hoop sections use the same base hoop so choose this first. Use the drop-down menu to make your selection. Remember to leave the dialog open
Multi-Hoop Dialog
  1. Move the First Hoop Frame - The first hoop is active and is highlighted in red. Since we analyzed our design in step 2, we know that the first sections to stitch in this design are at the bottom so this is where we'll position the first hoop. Using the mouse, the hoop brackes is dragged into the desired positon. If needed, the active hoop can also be roated using the hoop rotation setting on the dialog.

  2.                     Move first hoop

  3. Move Second Hoop Frame - Drag the second hoop frame into position and rotate if needed.

  4.                    Drag Second Hoop

  5. Add Additional Hoops if required using the Add Hoop button on the Multi-Hoop Operations dialog. We don't need any more for this design so we are going to move onto the next step.

  6. OPTIONAL: Depending on the design and the placement of the hoops you might want to center the design within the custom hoop layout using the BuzzTools > Center Both command.

  1. Stitch Assignment - Because we took the time to analyze our design and layout the hoops in a position that made sense, we can let BuzzEdit make the decisions as to how to best split this design.

    In the Stitch Assignment area of the Multi-hoop Operations dialog, select the All Stitches Within Any Hoop option and click the Add Stitchesbutton. BuzzEdit asks if it should use the fewest hoop sections for the stitch assignment. We recommend you leave this option unchecked unless you have already tried it and not liked the results.
  1. Do Not Close the Dialog Yet! First take a look at the Stitches-in-Time graphs and see how many hoop sections were created. If the number of hoop sections seem reasonable, check each section by double clicking between the Hoop Flags on the Stitches-in-Time graph.This selects the stitches that are contained in each hoop. If the results look good, close the Multi-Hoop Operations dialog.


                        Drag Second Hoop
    If you don't like how BuzzEdit split the design, chooseEdit > Undo and try a differerent setting or hoop position. You can also use a more manual stitch assignment approach such as the one used video below.
  2. Are we done yet? Not quite! Add alignment stitches using the BuzzTools > Multi-Hoops > Insert Alignment Stitches command so that the design can be lined up correctly at the embroidery machine. This command is a little hidden but don't forget this step. It is required since free form multi-hoops are not locked in the hoop frame.
  3.                     Insert Alignment Stitches

Watch it on YouTube

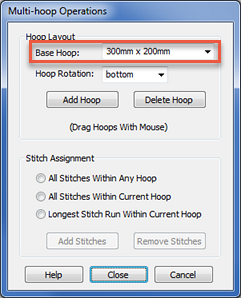
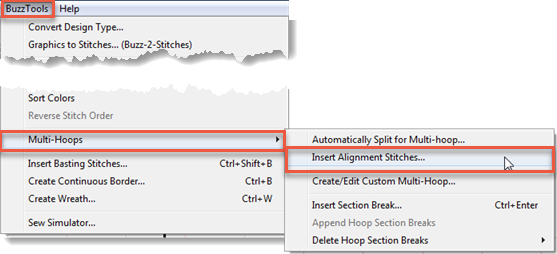
Creating and Using Free Form Multi-Hoops

For another example using the multi-hoop tool and for information on how to line up your embroidery design at the embroidery machine, watch the Buzz Tools video tutorial on how to create Free Form Multi-Hoop Layouts. The video was recorded using BuzzEdit v3 but the procedure is the same in BuzzEdit 4.


Think about it

QUESTION: What would have happened if we hadn't analyzed the design before we started?
ANSWER: We might have positioned the hoops vertically which in this case would have resulted in mess with 18 multi-hoops. Not something I want any of you to have to try to stitch!