Is your software obsolete? Find out how to upgrade...

Bee BuzzTools.com

General Buzz Tools Software Tutorial

How to create a backup CD for your downloaded software

Woman holding blank CD

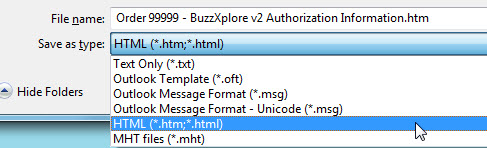
When you purchase downloaded software, you won't automatically receive a backup CD. In fact it has become so easy for you to create your own backup CDs that we encourage you to do so yourself. Why wait for the mail to arrive when you can have the security of your backup CD right now? In addition, we sometimes hear from customers that their CDs arrive cracked even though we pay extra to ship CD at package, non-machinable rates. Guess the post office just loves their high tech sorting machines so much that they just stuff anything through them that they can. So here is how to save yourself some money and trouble - make the backup CD yourself. In fact it's so easy, you'll want create backup CDs for all your downloaded software.

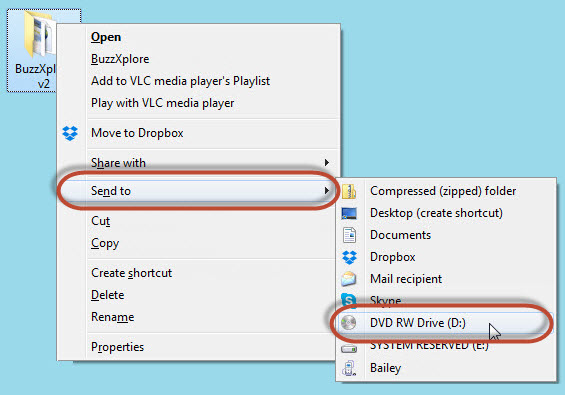
TIP: If you're not sure if your drive can write CDs and/or DVDs, just click on Start > Computer and find your drive. If it is shown as DVD RW or CD RW than it is a read/write drive and it can be used to create a backup CD.

Create your Backup CD

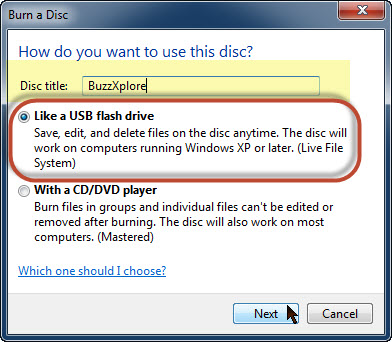
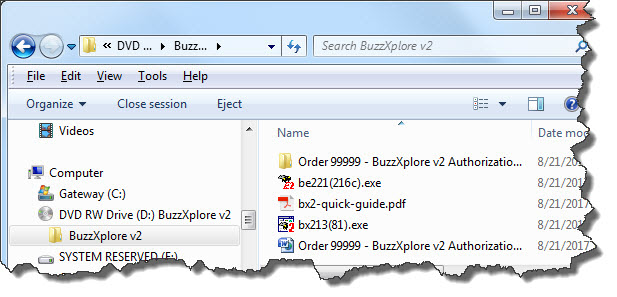
With the newer versions of Windows, it's easy to create a backup CD of your downloaded software. No extra software is required - Windows now does it for you. Before you get started though, be sure you have recordable CDs or DVDs. Most types work just fine but I prefer to get a name brand as they make me feel a little more secure. Writable CDs and DVDs are available at all office supply stores and online.

Windows 7, 8 or 10
  1. Organize Your Files
    • Put your downloaded software installation file(s) into a folder along with any other related files you might want to include in your backup. For example, your software might include the installation program and user manual.

      Save As to Your New Folder

       
    • Optional but highly recommended - Using your email program, select the email with the authorization information and use the File > Save As... menu to put a copy of your authorization email in the folder with the installation files. If this isn't available, print a PDF copy of the email using the Windows provided Save as PDF or other PDF printer. If you can't do this, that's OK too but you will need to print a copy of your information to keep with your installation CD.

      Outlook Save As menu item     Save the email as HTML or TXT

       
  2. Right click on the folder you created in step 1 and choose the Send To > DVD RW and select your CD RW or DVD RW drive from the menu.

    Send To DVD RW

     
  3. Windows will open the drive drawer and ask you to put in a disc.

    Burn a CD

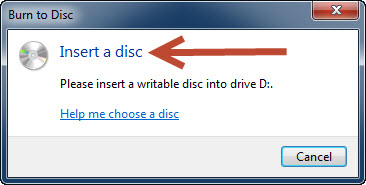
    Place a blank writable disc face up in the tray and gently press on the door to close it.

     
  4. The next dialog you will see will depend on the CD/DVD RW you have but they are pretty much the same. Put a descriptive name in the title field and either option will work. We tend to have a slight preference for the Treat as USB Driveoption if it is available just because additional files can be added later if you forget!

    Burn a Disc dialog

     
  5. The disc will be formated and then your files will be burned onto it. Once it is finished, remove it from the tray and label it! I use sharpies on my discs and have never had a problem. If you didn't include the serial number and key in your files, you can write it directly on the CD or DVD. I also like to include the date of purchase and website information.
     
  6. Browse the Finished Disc - When the sharpie ink has finished drying, put it back into your CD or DVD tray and use the pop-up options to view it's contents. This last check will ensure that your information is really on the disc. If it is very important files, you can also try starting the installation program to make sure that it runs and/or opening some of the docs you included.

    Browse the finished CD