
Graphics files are generally classified as raster (bitmaps) or vectors. Within each category, there are numerous file types which are just different ways of storing the graphics information. When you auto-digitize a BMP, GIF, TIFF or JPG graphic file, you are using a raster (or bitmap) graphics.
If you decide to use a raster graphic, you'll need to be aware of its resolution as it is critical to your design creation. In general, if you see a fuzzy garbled background image in Buzz-2-Stitches, your graphic probably has too low of a resolution and it may not produce good results.
Graphic resolution describes the amount of detail a raster (or bitmap) image holds. Higher resolution images are crisper and contain more details. The same image at a low resolution will have less details, blurred edges and color loss. There are many kinds of resolution but in general resolution is measured in either pixels per inch (ppi) or dots per inch (dpi). Dots per inch came about because printers measure the number of dots of ink per inch that a printer deposits on the page. For our purposes, we are using DPI to describe the resolution of the graphics used for auto-digitizing.
TIP: When analyzing a graphic for auto-digitizing, it helps to know that the stitches of an embroidery design need to be at least 1 to 2 millimeters in length. Stitches smaller than that can cause bobbin thread nests when sewn. Buzz-2-Stitches closely examines your graphic at the 2 millimeter level as it decides where to place stitches and color breaks. To quickly examine your graphic, set your grid to 2mm (via the View > Preferences command and insert the graphic as a background image at the desired embroidery size. Then zoom in your workspace and look at the details contained within the grid squares. Is the image still smooth or does it look like a bunch of squares? Where would you place a stitch?

As a general guideline, your image should be around 300 dots per inch (DPI) and no less than 75 DPI.. If your graphic doesn't list DPI, just look for the number of pixel in the graphic and do the math. A four inch square graphic at 300 DPI would be about 1200 x 1200 pixels (or dots per inch). If you have a 300 x 300 pixel image, you should probably stick with a 1 to 2 inch square design.
Your embroidery won't look any better if you use a graphic with a higher DPI. In fact it might look worse since graphics that are too large are automatically scaled down by Buzz-2-Stitches which may cause a loss of details. Graphics that are too low resolution are scaled up which causes fuzzy details and blurred or jagged edges.
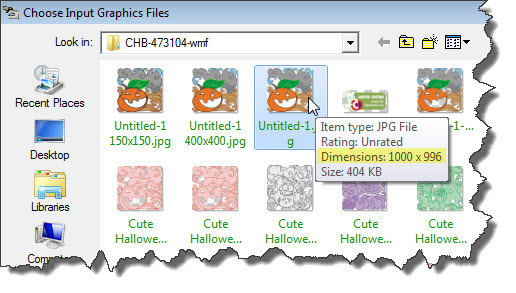
To find out the size of the graphic: In the Buzz-2-Stitches Choose Input Graphics Files dialog, hover the cursor over the top of a graphic. The dimensions of the graphic are shown in a pop-up window.
Finding the DPI
Avoid resolution issues by converting your raster graphic to a vector
If you only have a raster graphic of the artwork available, consider running it through a program that will trace the image and produce a vector graphic. This way you can inspect and modify your graphic before it becomes stitches (which is often easier to do). One such program, Vector Magic was used to demonstrate this amazing transformation. Vector Magic is just one program that will produce a vector from a raster graphic but we did find this program pretty easy to use for the novice and they allow for a few free image conversions on their web based trial. Just remember to save your vector as an EMF format for easy use in Buzz-2-Stitches.
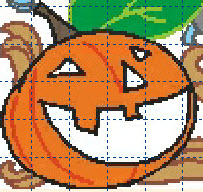
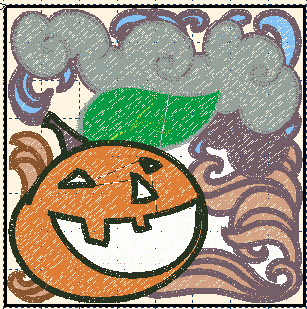
Below is an example of a graphic at two different resolutions. When opened in Buzz-2-Stitches, you will notice that the graphic with 300 DPI has sharp, crisp lines which will create a better embroidery design.
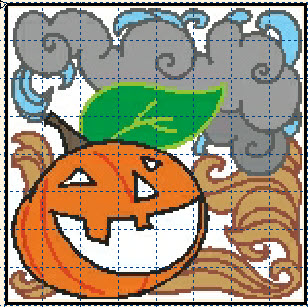
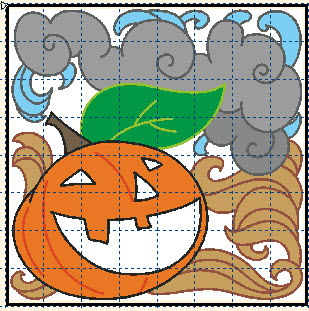
See what happened when we created an embroidery design using the above two graphics. The settings in Buzz-2-Stitches were identical, only the resolution (or DPI) of the graphic changed.

So when you search for clip art, create graphics or request them from a customer, you will need a file type supported by Buzz-2-Stitches and an appropriate DPI.
PRO TIP: If you are doing auto-digitizing to create embroidery for customers, don't accept shoddy graphics. It is unlikely you'll get a good result from tiny web graphics or scanned business cards without recreating the graphic in a secondary program such as Photo Shop. If you do decide to accept poor graphics make sure you charge the customer for your time correcting their graphic and allow time to work with your auto-digitizing software so that you can get the type of embroidery design your customer will love. Remember, it's your job to set the requirements and the design expectations so that both you and your customer are happy with the results.